There are traditional lodging options (can’t beat the convenience of an in-park lodge, yet they come at a very steep price) but to get the true “feel” of vacationing in nature, most go camping or RV-ing. There’s an added dimension to a vacation spent driving from RV park to RV park. A camaraderie amongst RV-ers that is hard to describe. One has to experience sharing stories from the road, the morning coffee, a cold brew, smores by the campfire, or even a tablespoon of sugar with a complete stranger to affirm that nature really brings out the best in people!
Having recently joined that growing faction of amateur outdoor enthusiasts, and drafting up a “wish list” of places to visit (a growing list that’s unlikely to be fulfilled in this lifetime) we set sights in the area, bought flights to Vegas, and began a painstaking planning process that covered over a thousand miles, 6 RV parks, and at least a dozen reservations, first of which was booking an actual RV!
There are national and regional outfits that rent RVs. Research showed some are OK, but most are rather shady. Alternatively, under the new gig economy, there’s literally something out there for everything, including RV rentals (RVshare.com). So that’s the path we took. In retrospect, there are some downsides to going direct to the owner [more on that later] but I still consider it the best option. Just be aware that RV-ing is not a “winter sport” and if planning to hit cold weather, make sure it’s properly winterized.
Fast forward 6 months. Las Vegas suburb. Early morning. 90 minutes with the RV owner, going over every operational detail. The guy was extremely thorough and accommodating. You’ll need less time if not an RV newbie. Tip #1: pack light and minimize luggage. He offered to keep our suitcases in his garage, so we unpacked things and stored them in the [limited] cabinets.


Heading up north on I-15, in about 3 hours (plus a stop for groceries and supplies) you’re in Zion. We stayed in Watchman Campground, an idyllic setting on the shore of the Virgin River, a stone’s throw from the visitor center. For that “luxury”, I had to book an RV site in December (with very few lots still open at that time) even though our trip was the first week in March (which is considered early season). Sure, there are other options in Springdale, or the small communities nearby, but proximity to the park saves time.
Aside from the winter months, when cars are allowed inside the park itself, the transportation in and out to the main points of interest (given the narrow valley and limited parking) is done via the park shuttle (hours and frequency depend on the time of year). Hence the importance of camping relatively close to the park. There are private campgrounds in the area, but typically more expensive. For state-owned, Watchman is open year-round; there is another one (Southern) that only opens over the summer, to accommodate the volume. Speaking of which, despite the early spring, we still had to wait for one bus to fill before we could go on. If this is considered “pre-shoulder” season, I’d hate to see what those lines look like from June to August… Tip #2: visit early spring or late fall to avoid the crowds. Considering that nights are still chilly in early March, then late September/early October might be the more sensible option (and likely a better scenery, with leaves changing color up in the mountain) …


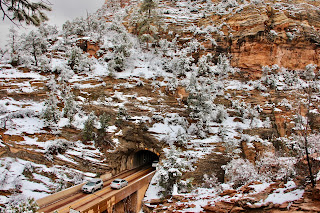
As you can see from the pictures, despite being the first week in March there were still spots of snow here and there, indicating that winter was still around. This should have been a warning for what was to come as we’d make our way up to higher altitudes, in Bryce Canyon. But more on mountain weather lessons learned the hard way, later on…
The average temps for Zion were supposed to be 58oF day / 31oF night. And we planned for it – to some degree – by packing layers, (I hear that’s what a good backpacker should do) hats, gloves, etc. Only it seemed at least 5-10oF lower, with a cold front passing through. This, and the limited shuttle schedule this early in the year, caused the first major edit to the itinerary: remove “the Narrows” hike from the itinerary.
The Narrows is one of the two iconic hikes in the park, and apparently “top 10” in the country on most lists. It’s an easy walk down the riverside up to a point, after which it requires wading through the actual river, with water knee-to-waist deep and even up to the chest in spots (they do actually shut it down late spring – when the snow melts – or during inclement weather when it becomes hazardous). In the summer, it could be a welcome reprise from the heat and does not require special equipment, but outside of that, canyoneering boots, neoprene socks, and a dry bib are required and can be rented from local outfitters. With a potential snowstorm looming, the weather colder than anticipated, all that gear to carry, and another big hike (Angels Landing) planned the same day, we decided we’ll leave something for “next time”. The folks at Zion Outfitters were very understanding and refunded the cost for our equipment (yes, of course, I rented in advance, duh!)


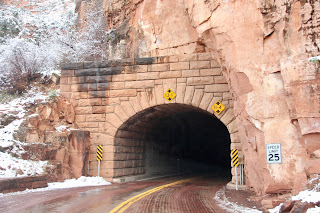
Day 1, with mostly travel to Zion, meant limited time for hiking. But just 15 min drive north of the park, on the other side of the Zion-Mount Carmel Tunnel there is a short trail (Zion Canyon Overlook, about a one-mile round trip) that opens to glorious vistas of the valley below. We went late in the afternoon, but I hear morning is best when sunrise adds almost a “curtain-raising” element to the scenery. Be aware, that parking for this trail is very limited (especially for RVs) and there is a fee to cross the tunnel (pay in advance at the park gate or office)
The Narrows is one of the two iconic hikes in the park, and apparently “top 10” in the country on most lists. It’s an easy walk down the riverside up to a point, after which it requires wading through the actual river, with water knee-to-waist deep and even up to the chest in spots (they do actually shut it down late spring – when the snow melts – or during inclement weather when it becomes hazardous). In the summer, it could be a welcome reprise from the heat and does not require special equipment, but outside of that, canyoneering boots, neoprene socks, and a dry bib are required and can be rented from local outfitters. With a potential snowstorm looming, the weather colder than anticipated, all that gear to carry, and another big hike (Angels Landing) planned the same day, we decided we’ll leave something for “next time”. The folks at Zion Outfitters were very understanding and refunded the cost for our equipment (yes, of course, I rented in advance, duh!)
So, with high anticipation for a big day the next day, we grabbed a quick bite at the Zion Brew Pub (elk burger was a delicious first) and went to bed early on what would be the first overnight spent in an RV. G’nite!
Next, check out the entry for Day 2 (or subsequent days in the journey as well):
Day 1 - Zion
Day 2 - Zion, Angel's Landing
Day 3 - Bryce Canyon
Day 4 - From Bryce to Moab
Day 5 - Arches National Park
Day 6 - Canyonlands & Monument Valley
Day 7 - Colorado River & Horseshoe Bend
Links below to help with planning and background info:
National Park Service official site: https://www.nps.gov/zion/index.htm
Recreation dot gov – for camping sites or special permit reservations:
https://www.recreation.gov/search?q=zion
Zion Outfitters (right by the visitor center; can’t miss it): https://zionoutfitter.com/
The Narrows: https://www.downthetrail.com/exploring-utah/zion-narrows-hike-wall-street/
Shuttle schedule: https://www.nps.gov/zion/planyourvisit/zion-canyon-shuttle-system.htm
AllTrails (this one is an app, but indispensable for any wannabe hiker)


